Re-cording a sash window
Re-cording a sash window is not as difficult as many people think. Recently I did ten in quick succession at the 1900 house we’re renovating in America and, for once, remembered to take pictures of some of the stages. The job is done from inside and only requires basic tools. With big windows especially, it’s useful to have a helper to take the weight at certain stages.
The process is shown with diagrams in Old House Handbook where you’ll also find details about repairing windows and reducing noise and heat loss.


 1. Remove the ‘staff beads’ which keep the sash in place by gently levering them away from the frame with a chisel. They’re usually pinned in place and can be re-used.
2. Free the sash nearest to the room by cutting the cords, leaving them as long as possible and holding the cords so you can gently lower the weights into the pockets. The sash can then be removed.
3. Remove the ‘parting beads’ which separates the two sashes. These are not usually fixed, but wedged into a groove in the frame so should be easy to release – although paint may need to be scraped away to free them.
4. Remove the outer sash in the same way as the inner sash.
5. Take out the ‘pocket piece’ with a thin screwdriver to minimise damage, generally it’s not glued or nailed but simply wedged into position. In the case of the windows I was working on, it was held by a screw.
6. Remove the weights from the pockets.
7. Tie a nail or screw to a length of string and thread it over the outer pulley. Measure the total length of the old cord and cut the new cord accordingly. Attach the cord to the string and pull the cord down into the pocket.
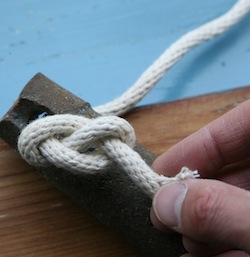
8. Attach the cord to the weight ensuring you use a knot that can’t slip – the figure of eight that I’ve used works well. Trim off any excess cord and pull the knot tight to the weight, there is often a recess to contain it.
9. Pull the weight back up inside the box and attach the end of the cord to the outer sash.
In all the British sashes I’ve encountered the cord is nailed into the grove on the edge of the sash, although if you use screws it’s much easier to adjust.
Interestingly, my job was made much easier because the American sashes had a hole at the end of the groove (see photo below) enabling the knotted end of the cord to be simply pushed into the hole – once the sash is back in the frame it can’t escape. It also means the sash is easily removed for painting and maintenance.
10. Fit the second cord and check that the window runs up and down freely.
11. Reassemble the window elements, re-cording the inner sash in the process.
Re-cording is normally best done once the sashes have been painted. In our case we’re temporarily putting off the painting process on the interiors until other work has been done.
Old windows are well worth saving – we believe the ones I was working on date from 1923 – the craftsmanships is superb, the timber is of a quality you can’t buy these days and many still have their original glass.

Just to add you should consider using a blade of some description to cut the groove between the staff bead and frame. This principal applies for the parting bead also. It will reduce damage to both frame and moulds.
Some sash windows in the UK have grooves down the sides of the sashes with a section to tie to. It’s an excellent system and very quick to implement. Wish they were all like that!
For best results decorate your windows whilst they are removed. They can be screwed in place whilst pait is allowed to set. Working on a bench with your sashes is ten times easier than at the window – if you are capable of removing and replacing them in the first place!
Good Post!